It’s almost frightening that I remember writing my “2 blogs a month” resolution in the blog I posted last New Year’s eve as if it were just a few weeks ago! This year went by so fast! Maybe the Earth is rotating faster? Or, maybe it’s just been an incredibly busy year. I think the latter theory is the easier answer, and doesn’t require elaborate scientific testing to prove!
I almost honored my resolution fully, but there have been a few months where things got so crazy I couldn’t check my email, let alone blog! My apologizes for the inconsistent postings, but the bright side is that all of the busyness means so much more to blog about!
Since these are the last few hours to post in 2010, I will tell you about my favorite project this year: The Guild Hall!
I’m sure I need not tell you that this project was for Felicia Day’s THE GUILD. I’m also sure that you have already seen season 4 of the show. If not, you are missing out! Definitely check it out. No, really. Go now. I’ll wait. We have till midnight…
The Guild is a show about a group of gamers. We follow them in their daily lives, and see how the game affects their social interactions. Or, lack there of. But, for the first three seasons, we never got to see what this game was that so influenced their lives. The music video “Do You Want to Date My Avatar?” gave us a peek at what Codex and friends looked like as their avatars, but it still didn’t reveal the world the game was played in. So it was very exciting for me to be able to create the first realized view of the Guild’s “in-game” universe.
Felicia had a general sense of what she wanted for the Guild Hall, mostly centering around Vork’s need for a very practical, minimal aesthetic. She described it in the script as cold and pointy, like you would hurt yourself just leaning against the wall. One of the character’s line of dialog was, “It looks like a prison in here!” So that’s where I started in the concept process.
The bigger question was how to execute the hall. We knew we were going to shoot the actors on a green screen and composite them in. But into what? A CG model? A series of matte paintings? There are many ways you can go about the effect, but I personally favor using miniatures.
My fear with pure CG was that, with our limited budget and time, we might not be able to control how convincing the effect would be. I felt that with a physical model, we could see what we were filming in real time, and make adjustments in camera to get it the way we wanted.
Sean Becker, the Guild director, and Chris Darnell, Guild director of photography, were completely on board with the idea. The thought of having an old school model suddenly made the Guild feel more like Star Wars or Lord of the Rings!

Photo #1: But planning was everything in order to fuse the real actors into the small scale miniature, so I began with a crude “white model” so that everyone could understand the space and how to move the actors around in it. On the green screen day, there was no environment to speak of, so it was really important that we kept all the heights and distances of the imaginary Guild Hall in mind, so everything lined up with the miniature Guild Hall later. This foam core and paper towel tube version of the model was used to do that, and the little plastic soldiers helped us keep track of where the actors were during the many shots filmed.

Photo #2: Once everyone was happy with the size and scale of the white model, I bumped it up to a more suitable scale for filming. Movie miniatures are usually not small! Actually, up until ILM did Star Wars, they were often huge. This is so there is no lack of detail when the film is projected 20 feet high. The bigger the model, the more real it will look. I chose to make the Guild Hall 8 feet long, 4 feet wide, and 3 feet tall. Way smaller than it would be in real life, but compact enough that it would fit in my truck if we needed to take it off lot for filming! The final scale actually ended up being ¾ inch equals 1 foot.
Kirsten and Nick built the shell from 1x3 and ½ inch ply. All the walls are “wild”, meaning that they can be removed one at a time so the camera can film from all sides. We put all the walls together, and Nick climbed inside to build the columns. This way, we knew everything would line up after we took it back apart.

Photo #3: In order to achieve the “pointy” look Felicia called out in the script, I decided to cover the walls in a series of spiky pyramids. I started by sculpting a single pyramid, made a mold, cast 15 more, glued them together as a plate, molded that, then Nick and Bryan spent the next week casting hundreds of those!

Photo #4: The center columns were made of PVC pipe and blocks of wood attached to the ends. These were covered in the pyramid plates, and the corners were filled with Bondo. A light coating of Bondo was stippled over the entire column to give it a rough stone quality.

Photo #5: Back in the box! Just happy to not be casting more pyramid plates, Nick and Bryan spent hours gluing all of the plates around the two-tiered lower wall. They needed to line up perfectly, because remember, what might seem like a ¼ inch difference to the naked eye will look like 3 inches on camera! (203)

Photo #6: Once all the plates were in, we taped off the outline of the walls, removed the walls, then used Bondo to create the cobblestone floor. Nick mixed batches of the Bondo, which sets in about a minute, Bryan would spread it in roughly one-foot square areas on the wooden base, and I would use a popsicle stick to carve in the individual stones. Right before the Bondo fully cured, I would brush it down with acetone to remove the sharp edges and give it a more organic look.

Photo #7: The next major element was the giant Vork statue. This was never mentioned in the script, but Felicia and I agreed that it goes without saying, if Vork built his own Guild Hall, it would have an enormous statue in his likeness!
Originally, I had secretly hoped to be able to use the Vork Unbreakable Bank I made last Christmas for the head, but the scale was way to large. In the end, it worked out for the better since I decided to sculpt him in more of a harsh imperial style.
I started, as always, with a wire armature.

Photo #8: Then I roughed him out in roma plastilina.
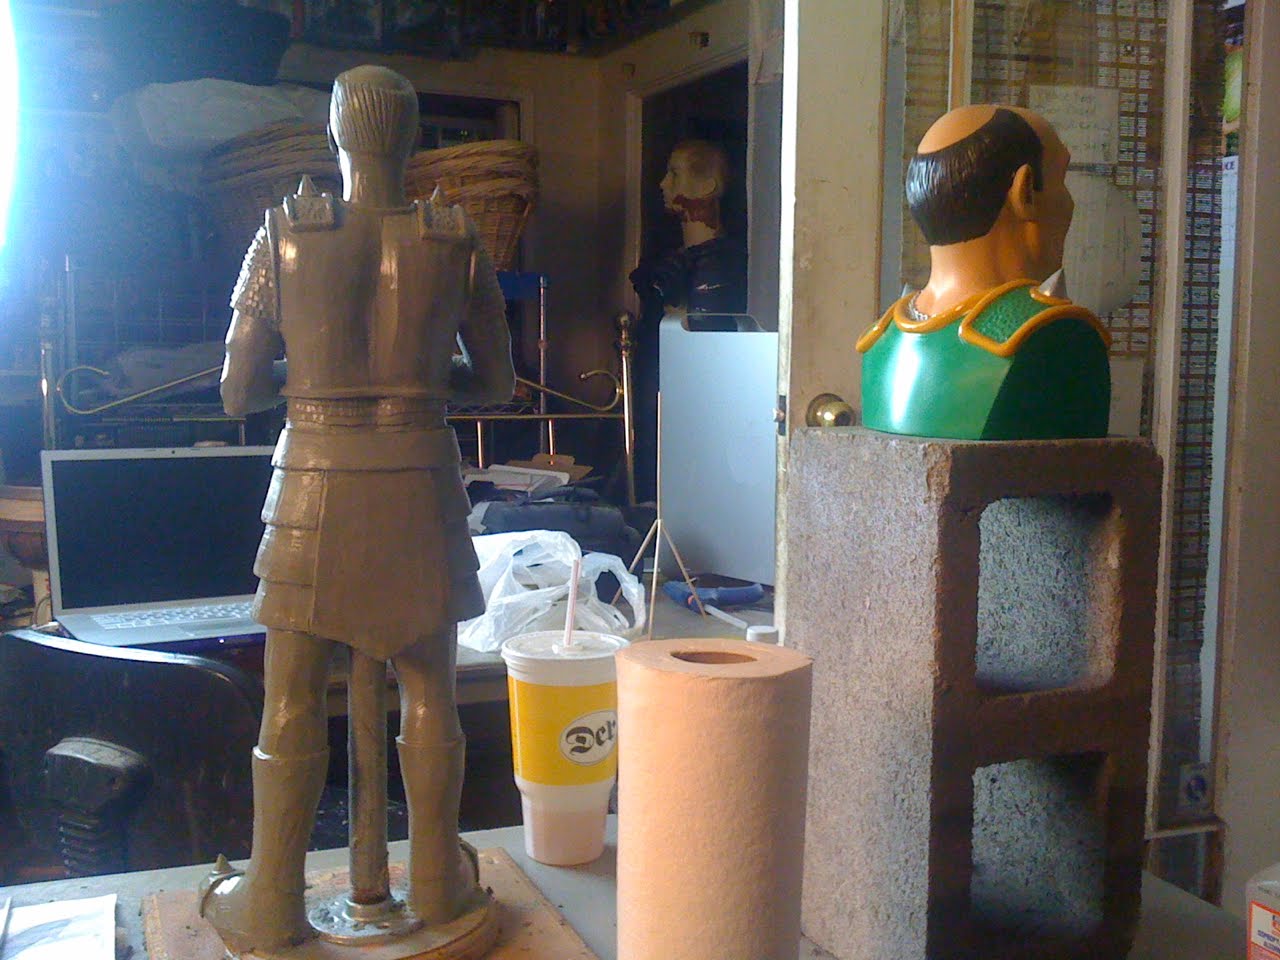
Photo #9: I did, however, use the Vork Unbreakable Bank as a reference! Dimensional reference always helps move things along faster than 2D reference, and I find that it helps even more when you created that reference in the first place! It’s like a sense memory thing, I guess.

Photo #10: Here’s the Vork sculpture complete. I carved in some chips and cracks to make it look like weathered stone. But the statue is still missing the sword he is resting his hands on. I decided to do that as a separate element.

Photo #11: I took some measurements for the sword, then started the molding process on the statue. I used a silicone matrix mold with a fiberglass jacket, which you can read about in another Guild post I did last January, GUILD XMAS BLOG 2: CLARA MOMMY AND ME COOKIE JAR.

Photo #12: The silicone can take up to 24 hours to cure, so I used the time to make other elements of the hall, including the miniature version of Vork’s sword. I made it the exact same way I did the full sized sword, only, well, miniature!

Photo #13: When the Vork mold was done, I cast up a copy out of 1630 urethane backed with expanding rigid polyfoam. After he was cleaned up, I placed him in the hall and we primed the whole thing.

Photo #14: The primer dried pretty fast, and painting began. I used the gray primer as the base color, and did a series of acrylic washes to model up the walls. I let the acrylic pool inside the deep textures, and kept colors darker in the shadows. We wiped the washes off with rags, using more pressure on the forward surfaces so there was less wash up front. This created a very gradated coloring, and made the faux stone look ancient.
I also did an overall wash of Payne’s gray on the floor, then went in with browns and grays to accent individual stones.

Photo #15: The Vork statue also got a Payne’s gray wash, but I added a few other layers of color to help separate him from the background. I also painted in some drips and runs, and gave a final light gray dry brush to pop the highlights.

Photo #16: And in case you are wondering, this statue is indeed Vork approved!

Photo #17: As the gang did final touches to painting the miniature, I went back to the desk to do some miniature paintings!
Even though this is Vork’s vision of the ideal Guild Hall, director Sean Becker wanted to make sure the rest of the guild was represented, too. So we decided to hang large tapestries of them on the walls between columns.
I though it would be funny to do the paintings in a darker style, showing more imposing versions of the Guild, like the oil paintings of 16th century monarchs. I did them in acrylic on canvas, so there would be a lot of texture. Technically, brush strokes and canvas weave wouldn’t read at this scale, but sometimes you have to push reality aside to sell an idea when it flashes by in a few frames!

Photo #18: Every column in the hall has a sconce, and the intention from the beginning was to have fire in them. As a general rule, the two things you should avoid the most in miniature photography are fire and water. You just can’t change their scale, so it’s hard to get them to look like they fit in a scaled down environment. We decided early on that Mazin would add the sconce fire digitally, but we still needed practical interactive light to help marry the CG fire into the physical model.
So Maz took apart a half dozen superbright LED flashlights and rewired them so every sconce projected a pool of cool light on each column.

Photo #19: And then filming began! Chris Darnell set up lights to simulate sun coming through the windows, raking across the hall is stark beams. We used a fogger to create a little atmosphere and diffuse the light.
Ultimately, we decided it would be easiest to shoot at the BarnYard. We left the model outside so we had more room, and it was easier to control the fog. But we shot at night so that the only light we had to deal with was what Chris provided.

Photo #20: When watching a film, you often forget how wonderful movie magic can be. This is the miniature of the Guild Hall from outside the camera. A wooden box and a few lights…

Photo #21: But this is the Guild Hall from the camera’s point of view! I love my job J

Photo #22: We started shooting from the front of the hall for 3 reasons. One, it was already set up that way from when we were building it. Two, majority of the shots were in that direction. And, most importantly, three, I wasn’t finished with the front wall yet!
 Photo #23: Chris set up a mini motion control rig to get the dolly shots for the end of episode 11 and the beginning of episode 12. The rig was necessary because the shots needed to be perfectly smooth in order for us to be able to track and composite the actors in later. Doing it by hand, even with dolly track, would make it to uneven and create flutter in the composite.
Photo #24: After the big tracking shots, we removed the left wall and moved in for coverage around the base of Vork’s statue.
Even though it seems like we have a bunch of fancy equipment (we borrowed it!), we are still a very small production. With a very small crew. Bryan, Nick, Maz, and myself kept building, dressing, and arranging the set as Sean, Chris, and Kim handled the production.
Here, Sean operates the fog machine as Chris lines up a shot.

Photo #25: So we are on the second wall, and it’s about 1am. Kim got us some 7-11 coffees, and we took a quick break. And what better thing to do on break than get some love from the French bulldog Art!

Photo #26: Kim couldn't play with Art for long, there was so much to do! But he wasn’t giving up that easily! He found her computer bag and made himself at home on it, sleeping there for the rest of the night as we worked away!
 Photo #27: Print managed to find a warm spot, too. Warm, yes, but safe? He’s a rebel, living on the edge.
Photo #28: After the break, I was finally finished with the front wall! The delay was caused by my compulsive need to actually put Vork’s self-indulgent gargoyles in the model. I thought Jeff’s delivery of that line was hilarious in the show, and I wanted to add that element into the model, but I ran out of time. Until I realized that if we shot that wall last, I could squeeze them in during filming. So, there I am squeezing in through the front door to finish them!

Photo #29: In the words of Kim Evey, “Creepy!” Yes, but funny, too! And of course, the Knights of Good royal crest above the door.

Photo #30: In order to make sure that the green screen elements matched up with our new model plates, Mazin did a quick 3D model of the Guild Hall and composited the actors into it for every shot. Essentially, this was our “pre-viz”, like live action storyboards. This helped Sean and Chris decide where the camera needed to be in order to match our real set with the virtual set we mapped out on the green screen day.

Photo #31: Another helpful device was the use of a perfectly scaled figure to help line up the shots. Especially with close-ups on actors, we always wanted to make sure that the backgrounds behind them were at the right height and the figure help to find the exact camera position.
Turns out the figure that worked best was one I did of Playboy model Alley Baggett for our Image comic “Alley Cat”. Luckily, I have a few of those around! Want one?

Photo #32: A solid 12 hours of shooting and the Guild Hall was wrapped!

Photo #33: And not a moment too soon! The sun was rising as we cut on the last shot.

Photo #34: There was a bunch of compositing and after effects to do still, but that’s another blog for sure!
The Guild Hall model is still around, so hopefully you will see it again soon!
That you for all the support you have shown my blog this past year! I can’t promise that I will post more often or regularly in 2011, but I can promise for sure that there will be many more exciting projects to share with you. The year hasn’t even started and I’m booked solid till next winter!
And if you feel like you need more BarnYard FX right now, check out my Guild Season 4 bonus feature, "Painting Team Cawkes!" It's a free download exclusively on itunes! Oh, and don't forget to pick up The Guild Season 4 on dvd!
Hope everyone has a fun, safe night, and an exciting new year!
Your friend,
Greg