For some people, summer means time to take off from work or school. For others, it's all about the beaches and amusement parks. But for me, the perfect summer is one filled with amazing blockbuster movies. I wait all year for the popcorn fair the summer season cinema brings. And at the top of the 2013 lineup is Pacific Rim, Guillermo Del Toro's ode to the classic giant robot and monster movies we all grew up with.
To celebrate the release of this much anticipated film, I teamed up with Polaris, Warner Brothers, and Legendary Pictures to create a video about some famous gamers training to be Jaeger pilots. It's pretty great! Check it out below...
For the actual movie, there were scores of CG artists rendering robots, and millions of dollars to create breath taking full size sets and hardcore pilot armor. We didn't have that. In typical BarnYard FX style, we had to be clever and practical, and pull all of our movie magic tricks out to pull off something worthy of such a prestigious project. Luckily del Toro and the guys at ILM gave us incredible imagery to work from.
Photo 1: To start the whole process, I had Amish draw up some Jaegers. If you don't know this about Amish, he is an expert on all things robot. If you have a Roomba vacuuming your floors, Amish probably knows its pattern settings. I figured if the thousands of hours Amish has spent watching Evangelion and building Robotech model kits was ever going to massively impact a project, this was the time to unleash it!
Photo 2: After Amish finished the turn arounds, and Guillermo, Warner Brothers, Legendary, and Polaris signed off on them, I blew them up to full size. Well, full size would be like 30 stories tall. Let's say, actual size! And in this case, actual size is the height of the people wearing them! Unlike the feature film, which uses GC exclusively to create the robots, we went old-school and built suits for stunt performers to wear. In our own fun way, this was our tribute to the classic sentai shows, like Power Rangers.
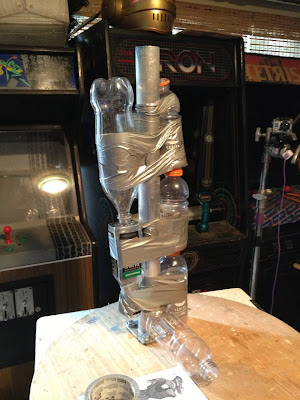
Photo 3: Now having a scale, I started sculpting pieces. I wanted the boots to be large, anime large. So I figured they were the best place to start to set the proportions for the rest of the suits. I kept the armature simple, a single piece of speedrail bolted to a wooden base, and some plastic bottles duct taped to it as filler. We drink a lot of Gatorade here at the BarnYard. It's good to reuse and recycle!
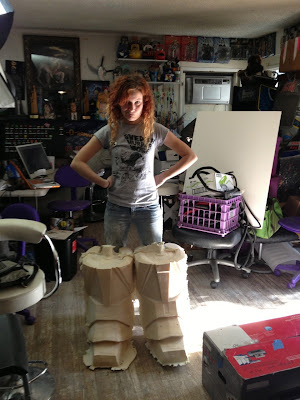
Photo 4: The first boot roughed out. Of you aren't sure how big it is from this photo, you are currently looking at about 150 pounds of WED clay!
Photo 5: More progress. I chose WED clay (which is glycerin based instead of water based) because it is fast and cheap. But it MUCH softer than oil clay, so geometric shapes are difficult. I had to actually let this sculpture dry out for a few days before I could start getting smooth surfaces and crisp lines.
Photo 6: Some guy finishing off the sculpture. This boot belongs to the Jaeger codenamed: Redflag Horowitz.
Photo 7: Out in the shop space temporarily called "the robot room", Kaygo starts to block out Redflag's head. On the smaller to mid-sized sculpts, we went with roma plastalina to keep the details and forms tight.
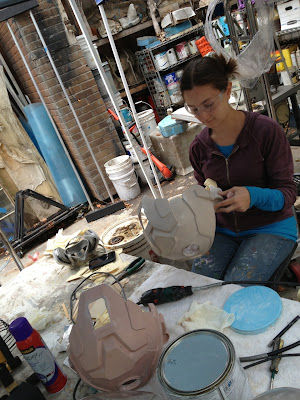
Photo 8: This is my sculpt for the head of the Jaeger named Shameless Fox.
Photo 9: With several sculptures finished, it was time to start molding stuff! Here I am explaining to our summer intern Emily how I want the mold split. Emily is in school for film design, and by the end of the first week at the BarnYard, she was building, molding, and casting like a pro!
Photo 10: Here's Shameless Fox's boot molded in fiberglass.
Photo 11: The more detailed sculpts needed to be molded in silicone. This rubber starts out in liquid form, and gets catalyzed to solidify. In order to get all of the air out of the thick liquid material before it sets, it needs to be placed into a vacuum chamber. It takes a while to get all the bubbles out, so Red5 gets comfortable while waiting. Um, I guess that's comfortable...
Photo 12: Emily puts the final layer on the Redflag torso. Yes, it was sculpted around Arnold. A soft foam version of the robot will be pulled from this mold so the stuntman can wear it and still have enough flexibility to move.
Photo 13: Not all of the robot parts were sculpted. Here, Sarah and Emily prepare to reinforce the upper torso Amish built from sintra for the Wolfqueen Jaeger.
Photo 14: This is a robot forearm that Amish crafted out of a PVC pipe, some sintra plastic, and a bondo stipple. We were invited over to Warner Brothers to review all of the film assets, so we tried to incorporate as many of the shapes and textures used on the movie's robots as possible into our versions.
Photo 15: Red5 preps on of the silicone molds for foaming. The waffle grid around it will lock into a fiberglass jacket to help it keep its shape during the foaming process.
Photo 16: The foam is a two part liquid that gets mixed together, then it expands into a solid, cushiony sponge. It creates a lot of pressure as it foams up, so Sarah is helping Arnold stay in the chest mold so the robot torso forms properly. Or, something else entirely different could be happing here. Time time to move on, nothing to see here, people...
Photo 17: Once the foam pieces are removed from the mold, they need to be trimmed and patched. Red5 gets ready to seam the Redflag boots. I told you they were big!
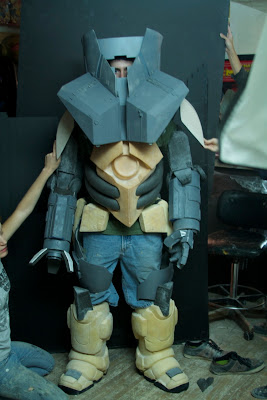
Photo 18: Each Jaeger suit had dozens of pieces. As we were getting close to having the molding and casting complete, we needed to do a test fitting to make sure everything was connecting together. The stunt guys weren't immediately available, so all of the short, scrawny artists here at the studio decided we would give it a go so we could keep moving forward. I know what Red5 is wearing for Halloween this year...
Photo 19: No one was safe from embarrassment on fitting night. Here is Amish as a junior sized Wolfqueen. That look on his face says, "I should have designed these things to be more comfortable!"
Photo 20: And finally me as Redflag Horowitz. Or I guess in this case, Redflag Aronowitz :P
Photo 21: Now knowing that we had all the pieces we need, it was time to bring the actual suit performers in and make sure all the elements were adjusted to fit them perfectly, and make sure they had the full range of movement necessary to make the robots come alive. Here Yoshi, a Power Rangers alumni, inspects his suit. Even not fully dressed, he looks better in the suit than I did!
Photo 22: With final adjustments made, everything is ready to start painting. The biggest challenge we had was that all of the different materials the suit was made of all needed to be painted with different kinds of paint, but all the colors needed to match! Here, Keri bases out those giant boots using PAX paint tinted to the Jaeger team's colors.
Photo 23: Once all the base colors were applied, the pieces came in to my "house of mess" where I aged them down with acrylic washes and added nicks and dings with chrome paint.
Photo 24: The final painting process involved highlighting panels and spraying semi transparent reflective tints over the face shields.
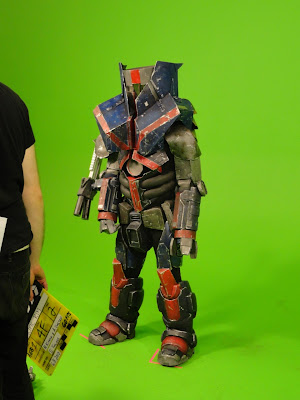
Photo 25: Everything was ready to go on set, and we did the final assembly on the stunt guys in front of a green screen.
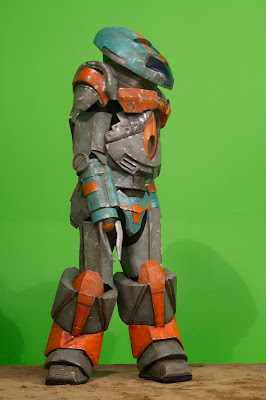
Photo 26: The Jaegers complete: Shameless Fox.
Photo 27: Wolfqueen.
Photo 28: Redflag Horowitz.
Photo 29: All of the robot footage was shot on green screen with a sand box floor, and the desert location was comped in later. Here, director Aaron Umetani explains a shot to the director of photography. I'm glad to see that I'm not the only one who is always making crazy hand gestures in on set photographs.
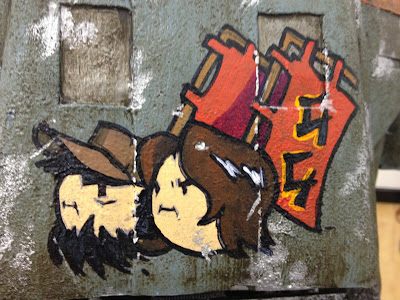
Photo 30: Just like in the movie, part of the original plan was to have WWII style nose art painted on our Jaegers. We ran out of time in pre-production, but the directors decided they could make a little time on set if I could still make it happen. Based on concept art that Amish did for each team, I hand painted the nose art on the Jaegers while the stunt guys were wearing them. I only had about 15 minutes a piece! This logo is on Redflag, piloted by the Game Grumps.
Photo 31: The suits were heavy and hot, so we needed to take them off the actors as much as possible. If there wasn't enough time to get them out fully, we would just remove as many parts as we could in the time we had, and then be ready to get them suited up again when the cameras started rolling. Here, Red5 is standing by!
Photo 32: To give the stunt guys a longer break, director Nathan Kitada dons Wolfqueen's arm to film some insert shots.
Photo 33: In the video, the Jaegers are piloted by some of the most popular gamers on youtube. Dodger dropped by the set to hang out with us and go all hands in with me and her very own Shameless Fox.
Photo 34: But our work wasn't done! We still had to get Dodger and crew geared up to pilot the Jaegers. In the film, each robot is piloted by two people who wear full body neuro suits. Legacy FX did the movie's pilot suits, and they are drop dead gorgeous. We made our versions out of used motocross and hokey gear, with a few specialty pieces like these scratch built helmets. Here, Keri preps the fiberglass casts to be fitted with the vacuum formed visors.
Photo 35: We didn't have a lot of time to customize the pilot suits, but I thought a few extra details might help sell them as being closer to what you see in the actual movie. I found an old carpenter's kneepad in the workshop that kind of resembled the shoulder pads on one of the official pilot suits, so I used the time I saved not having to scratch build on to sculpt the Pan Pacific Defense Corps logo on the found piece before molding it. When del Toro saw the final product, he asked, "How did you get those?"
Photo 36: Nathan and Aaron knew they were only ever going to shoot the pilots from the chest up, so we didn't make lower suits. The gamers wore their own close, and we put the armor over it. Here, Game Grumps JonTron and EgoRaptor rehearse in costume.
Photo 37: Jesse Cox and Dodger make Jaeger pilot suits look fashionable as they prepare to set Shameless Fox in motion.
Photo 38: Fully geared up, Husky Starcraft and Total Biscuit work as one mind to pilot Wolfqueen. This shot of the on set monitor shows what the camera sees. For all we know, Husky isn't even wearing pants!
After the shoot, the VFX team comped in the pilots chamber. Ironically, for the film, the pilots chamber was a real set, and the robots were all digital. For our video, we did the exact opposite!
Photo 39: Well, that's a little behind the scenes on our Pacific Rim video. I hope it made you smile, and better yet, I hope it made you want to go see the movie! Summer doesn't count until you do!
Let me know what you thought of the video, the movie, and our Jaegers below. And be sure to follow me and my BarnYardFX crew, as well as our friends on youtube, on twitter and instagram for more updates and pictures on this and future projects!











hey can i ask what foam you used for the foaming? i searched for 2 part foams and only came up with hard setting type, used for cavity wall insulation.
ReplyDelete